• What is Simple Suburban Living?

    Homesteadin'. Green living'. Animal lovin'. Square foot farmin'. Tree huggin'. Followin' Jesus. That's Simple Suburban Livin'.

  • Backyard Chickens

    Our little homestead grew with the addition of chickens this year. We are happy to share the journey of raising chicks and building the chicken coop with you.

  • Aquaponics and Gardening

    Simple Suburban Living offers a weekly aquaponics episode that highlights the saga of our indoor aquaponics gardening system. We also share our knowledge of square foot gardening and planting seeds. Our homestead is located in southeastern Michigan.

Showing posts with label build stuff. Show all posts

Monday, May 30, 2016


The SSL Family Mom wanted a better sound system for her recent birthday, this is what she got....
In this video I go through a very high level overview of the Kicker subwoofer installation. I am using all Kicker brand products here listed below.


To see the full video on the project, click here.


The next step in the bonus room renovation is to get these closet doors built. In a normal situation you can just run out the big box store and buy a pre-hung door. This would include the frame that just slides into your opening and with minor adjustments you have a door. Well, in the case of this bonus room I have slanted ceilings and shorter than standard opening so I need to make something custom. Here is the process that I used, right or wrong they turned out great!


To see the full video on this project click here


 and follow us on....


Saturday, May 14, 2016


In the midst of several other projects I have pending I have started yet another project - this bonus room renovation. 


 We have what is called a "bonus room" in our home above the garage. This is a basic multi-use room that was added during construction but does not have closets and therefore is not considered an actual bedroom. My oldest daughter has been calling this her home for the past five years and it is far past time to get her some proper closets.


I started by removing the carpet and framing in an area under the window for a "daybed" and a closet on each side. The daybed will hold a regular twin mattress and be used for guests and sleep-overs.


The slope of the ceiling will make it hard for the closet doors but there is just enough room for me to walk standing straight up at the tallest point. The closets will later get a custom door and shelf on the inside.  


Time to stand back and admire your work........  Is that a little bit crooked......

With projects like these I always like to call in the cleaning lady to pick up after my mess


The day bed is framed in so that the mattress will sit just below the front wall and below the windowsill so no one rolls out to the driveway below:) This entire area will be covered with 3/4" pine plywood I have left over from the plywood flooring project. This will provide a bit more durability for the kids jumping around and climbing in and out.


At this point I also did the rough electrical. I wired everything into a junction box that will be accessible from the back panel of the day bed. That is where an old receptacle used to be that will now be covered by the bed framing. I will be added one receptacle on the front wall of the bed and two lights, one in each closet.


Thursday, January 14, 2016

https://youtu.be/urQMSQ9UKf0

I was asked to help with some props for the Christmas play this year and so I signed up to make some giant candy canes, seems easy enough, right? I started by looking around on Pinterest, Google, and YouTube for ideas. I wasn't impressed with what I was finding and so I came up with a design of my own. There are some great ideas out there using larger PVC piping and cardboard tubes but the cost and time required was too much for what I was in for. So I decided on the following process.
You will need
2 10' sections of 1/2" PVC pipe
2 rolls of white duct (duck) tape
2 rolls of red duct (duck) tape
4 pool noodles
Hair dryer or heat gun
Some scrap wood and piece of plywood (could also use a deck or come up with a  different way to bend the pipe)

Step 1 - Start by laying out the shape of the candy cane on the plywood. I used a trash can lid to trace the curves and adjusted it until I liked how it looked.


Step 2 - Cut up some small pieces of scrap wood and nail or screw them along the line you have drawn. Alternate pieces on each side of the line leaving space in between for the PVC pipe


Step 3 - Start to feed the PVC pipe through the template heating it with the heat gun or hair dryer as you push it through. This process takes a bit of time, just keep applying heat, alternating sides, and pushing the pipe further into the template in increments.


Step 4 - Once the pipe is shaped and cooled pull it out of the template and then slide two pool noodles over the PVC pipe. Cover all of the pipe except for whatever is left over a the bottom. You can cut this extra piping off and make the candy canes as tall as you need them to be.


Step 5 - Start with the white tape and wrap a piece around the seam between the two pool noodles. Then starting at the top, wrap the white tape around the noodles on an angle until you get to the bottom. Do this about three times until all of the pool noodle is covered in white tape.


Step 6 - Starting at the top, wrap the red tape around at an angle (like a candy cane) until you get to the bottom. This is the hardest part, try to keep the tape flat and evenly spaced as you wrap it. This is best done with two people, have one person hold the candy cane and the other hold the tape. Have one person turn the entire candy cane as the other applies the tape. You may have to work with it a little bit before you get it the way you want it.


Check out the full video here
Red Duck tape - http://amzn.to/1NUawEL
White duck tape - http://amzn.to/1NUayfG
Pool noodles - http://amzn.to/1NUaAEA
All of these products and more recommended items from the SSL Family are available at the
Please follow us on....

Saturday, January 9, 2016

https://youtu.be/p-ZlH9lwnso
Plywood flooring is complete!  I could not be happier with  how this turned out and may end up doing the other rooms in our home with this same process. If you have not seen the process of creating the plywood flooring please check out the article here or the full video here.


Before I got started with staining I chose to run over the entire floor with a 150 grit power sander. I did not spend a whole lot of time on it just enough to take any dings, dents, and scuff marks out that I most likely added while installing the flooring. Once this was done I cleaned the entire room as best as possible with a vacuum and damp towels and we were ready for stain.


http://amzn.to/1jxBmnY

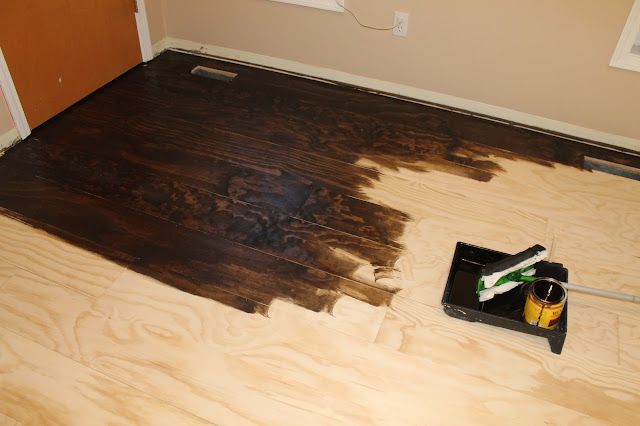
I chose a Minwax dark walnut stain to give the floor a dark old farmhouse kind of look. You can apply this stuff many ways but what I found to be the best was a homemade creation as usual:) I used an old Swiffer mop handle and head and stuck a cotton t-shirt to it. I dipped the contraption in the stain using a paint tray and then spread it on the flooring. This saved my back, a lot of time, and applied the stain fairly evenly.


  After the first coat things were starting to look really good but a little bit lighter than we had hoped.


 Two coats of the stain were applied about 24 hours apart which gave the floor a deep rich color that we absolutely loved. It was really starting to come together now. This is the point at which I began feeling relieved that this project was going to turn out exactly  how we wanted it to.


http://amzn.to/1O2bSHJ

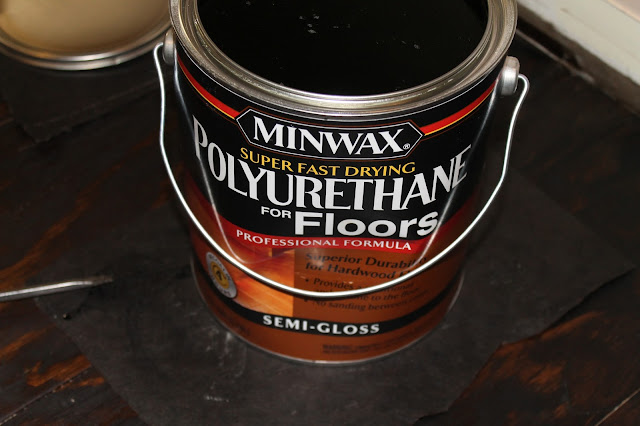
Once the stain fully dried we were ready to start putting on the final protective coating. We chose a Minwax flooring polyurethane to seal the floor.  This seemed to be the best, most durable, and easiest to apply option.


I started applying the poly one coat at a time with a small paintbrush. This method worked very well and although a bit slow, this stuff goes on very easily. I applied 4 coats of poly allowing each coat to dry for 6-12 hours before putting on the next. This is a quick drying poly so you can put it on in as little as 4 hours if you would like.  I did not sand between coats; as directed this stuff is supposed to dry pretty flat without needing to sand each coat.


 After 4 coats were applied I chose to do one round of sanding to knock out a few bumps I was starting to notice and some dog hair that somehow floated into the room and had dried into the finish, stinkin' dog! I used a power sander with 220 grit paper and I did not push very hard at all while sanding. I just let the weight of the sander float on the floor until it was smoothed over very lightly.


Next I cleaned the floor with a damp cloth and applied the final coat of poly. I applied this final coat a bit thicker and let it dry over night.


After the final coat was dry the floor was safe to walk on and inspect and it looks awesome! It turned out much better than I could have imagined and the poly makes the flooring so durable. Even though this is a "soft" wood (pine) it is now very hard and resists scratches and scuffs very well. I will do a follow up on this project next year and update on how well it holds up to the changes in seasons and wear and tear or a 9 year old:)  

How much did it cost? The room that I was covering was about 165 square feet and the total cost was about $253. This works out to about $1.50 per square foot and is much cheaper than traditional hardwood flooring.


Check out the full video here


Dark Walnut Stain - http://amzn.to/1jxBmnY
Polyurethane - http://amzn.to/1O2bSHJ
Porter Cable Brad Nailer - http://amzn.to/1O2chdh

All of these products and more recommended items from the SSL Family are available at the Simple
Suburban Living General Store


Please follow us on....


Wednesday, January 6, 2016

https://youtu.be/wmRYKrfQjuk
Plywood flooring? Check out this inexpensive alternative to traditional wood flooring that you can do for less than half the cost. Although plywood flooring is not as durable as a solid wood floor it is by far less expensive and with the proper treatment can last many many years in great condition.


I started this project in order to give some relief to my middle daughter who suffers from allergies and asthma. The carpet was old and when you walk on carpet, no matter how clean you think you get it, it kicks up dust and allergens. It was time for something different for her. Although this was a priority we didn't have the  money in the budget for a new hardwood floor and after looking into other options (reclaimed wood, laminates, etc.) we decided to give the plywood flooring a try. I have seen a few other videos and posts around on the net and it seems most have pretty good results.


So, with a budget in mind I was off to our local building store (you guess which one). Our room was 165 square feet so I needed to get about six sheets of plywood to cover the area. That is based on 32 square feet per sheet with a little bit extra. I ended up going with a thicker plywood than I had originally thought because I really liked how flat the sheets laid and also for long term durability. I chose 23/32" pine sanded plywood for $29.98 per sheet. There are lots of choices here and you can go with a hardwood plywood or a thinner softwood to cut cost even further but I would recommend spending the extra money and at least getting the sanded ply that is about 3/4" thick.


Once I had the plywood chosen I loaded up with the help of some of the associates there and asked if they could hook me up and cut some of the plywood for me. After all, who wants to cut 6 sheets of plywood into stripes:) I was going for 8" planks since this divided evenly from 32 and it seemed like a good size for that farmhouse look. They said they could cut it into 16" stripes for me but no less due to safety concerns. ( I went back for more on a second trip and they did cut it down to 8" except for the last cut on each piece of plywood).

Back home I had already removed that nasty carpet and padding and also took out the moldings along the floor. I then laid down some roofing paper or tar paper that I had left over from another project to cover the subfloor. I used a staple gun to secure it to the floor. This will provide a sound barrier and also liquid barrier for the OSB subfloor below.


Out in the garage I used my $5 super fancy table saw to rip the boards that were not cut at the store into 8" strips. I then carried them inside and placed them in the room for a day or so to acclimate to the humidity and temps inside.


I wanted each plank to be a bit pronounced from it's neighbor and my wife came up with the idea of rounding the edges. The thought of rounding the edges of all of those planks was a bit overwhelming at first but it actually didn't take that long at all. I made a quick sanding block from a piece of 2X4 and sandpaper and quickly knocked the edge off of all of the top edges. I went through first and picked out the best sides and stacked them accordingly to make things easier.


 Now the fun part, nailing! I started by using a chalk line to mark a line long ways down the room at close to the middle of the floor. This gave mea  good starting point to work outward in both directions with the planks. I didn't want to just start on one side and work all the way across fearing that I might be off by too much for the molding to cover once I reached the other side. I am using a pneumatic brad nailer to secure the planks with 1 1/4" nails.


I chose to use a random pattern with everything. So no two seams will line up and no two nails are right next to each other. This was easiest to layout, looks the nicest, and has the least amount of waste.


I did not leave any gaps between boards either on the sides or at the ends. Most of this wood is fairly "wet" still and will shrink a bit. Also, plywood by design does not expand and contract much vertically so I am hoping for no real expansion and contraction issues. Only time will tell and I will keep you updated on that.


 I couldn't be happier with the first stage of this process, it looks like a real old school farmhouse floor. The boards lay nice and flat and the sanded edges make them look like hardwood planks. In the next phase I will go through sanding and finishing the flooring to give them a classic hardwood look. Stay tuned for that article and video soon. Thanks for checking it out!


 Check out the full video of this project here


You can also  follow us on....

Tuesday, October 20, 2015


We have loved having this pool heater available to boost the pool temps a bit in the spring and fall. It has worked great although over the last year and a half has lost some efficiency. Taking the advice of some great feedback on the first build I am going to try a few new ideas with this and see if I can't get a more efficient heat transfer and boost the temps up even more!


The most common feedback I received was "Why don't you wrap the copper tubing around the outside of the barrel?" This is a great idea and one that I had considered before I started the first version of the pool heater. I ended up deciding to put the tubing on the inside of the barrel because I wanted it to be engulfed in the flame with no tubing exposed to the outside air and I also didn't like the look of the tubing on the outside. In the end this is what I have found...

The coil on the inside is much more efficient at absorbing the heat; however, it does not hold up as well over time since it collects soot and creosote over time and becomes less efficient. Overall this is the best approach but you will need to take the coil out each year and clean it up.

The second approach was to wrap the coil around the outside of the barrel. This also works very well but in order for it to be most efficient it will need to be covered in some sort of insulation to keep the heat around the tubing. I noticed that the outside area of the tubing is actually working like a heat sink and cooling the outer side. With good insulation wrapped around the barrel with the tubing in between the heat would be trapped and provide the best heat exchange to the water. I am currently looking for some good outdoor insulation that I can use for this application.

In the meantime I have both the coil on the outside and the one on the inside in use and the temps I am getting are fairly close to what I had when I first started the project last year.

This has been such a fun project to work on and experiment with and I am excited for the winter season so I can test it's use heating my garage again! Stay tuned for updates on that and thanks for stopping by!

Soldering equipment -

Spark start torch head - http://amzn.to/1BMl54f
Mapp Gas cylinder - http://amzn.to/14G5DdF
1/2"-3/4" pipe and fitting cleaner combo tool - http://amzn.to/1BSy2ao
Tight spaces pipe cutter - http://amzn.to/1y0INKD
Pipe cutter - http://amzn.to/1xP2qDj
Lead free solder - http://amzn.to/1wGPqvL
Flux - http://amzn.to/1yPxXqA


The Vogelzang single barrel kit can be purchased here - http://tinyurl.com/onurub9

Fiskars X27 splitting axe - http://amzn.to/1QEOfrG

All of these products and more recommended items from the SSL Family are available at the Simple Suburban Living General Store


Please follow us on....

http://www.pinterest.com/simplesuburban/
http://www.facebook.com/simplesuburbanliving
http://www.twitter.com/simplesuburban5
http://www.instagram.com/simplesuburbanliving


Tuesday, August 4, 2015


I have had  a few questions about the sliding door for the chicken coop and so I thought I would do a quick video since I have not really shown the details previously. The design I came up with for the door is very simple and easy to setup and can be done with scrap wood left over from building the coop.


For the door itself I used some poster board to free hand a egg shape that was of suitable size for the door. I then traced it into place on the chicken coop siding and used a jig saw to cut out the opening. Once we had your hole I screwed in 2 2X4's on each side of the framing for each side of the door on the inside of the coop.  This will act as the guide for the sliding door. These guides protrude about 1/2" out from the framing. I used some scraps of 1/2" OSB and nailed them to the front edge of the 2X4's to keep the door from being able to swing inward. I then cut a piece of left over OSB to fit in the track I had created and screwed in two eyelets tot eh top edge.


I am using some nylon rope I have lying around but you can use whatever you have available I tied off the rope through the eyelets in a triangle to leave one main rope centered on the door leading straight up from the center of the door. Directly above the door on the ceiling I screwed in another hook (better to use a full eye here)  this servers as the lift point for the door and routes the rope over to the side top edge of the coop. I drilled a hole through the siding between the framing and roof joists and routed the rope through. The outside of the coop has a small hook and the rope has a loop tied in it to hold the door open.


This setup has been working pretty well for the past year and a half but there are a few improvements I will probably make. I wish I would have used larger gauge hooks and eyes for this project since I have had a couple of the bend and pull out. Not a big deal but just something I had to fix. I would have left a larger gap on the tracking so that the door had more room for expansion and contraction depending on the humidity and temperature as sometimes it can get a little stuck in the summer months. I also would have left a gap at the bottom of the track so that any bedding or chicken mess could not get stuck in the track.


Simple Suburban General Store


Please follow us on...


http://www.pinterest.com/simplesuburban/
http://www.facebook.com/simplesuburbanliving
http://www.twitter.com/simplesuburban5
http://www.instagram.com/simplesuburbanliving


Monday, May 18, 2015


Over the past year I have received overwhelming support and feedback on my chicken coop design and construction. There have been so many wonderful comments and so many have copied this coop and made it one of their own. During this chicken coop building season (yes there is a season for these things) I have received quite a few questions on various aspects of the coop and so I thought it would be nice to run through and answer a few of the ones I hear most frequently.


Does the feed get stuck in the feeder? Does the feed spill on the ground? The feed has no trouble gravity feeding down the center pipe and into each trough on the sides. While the chickens eat they shake it a bit and the feed gently falls down where they can get to it with no trouble. Some feed does spill out, especial when the feeder is full. This has not been an issue as they scratch and peck and get at it off of the ground and also get some needed grit in the process.


Does a lot of water drip on the ground? In short, yes, however this has not really been an issue outside the coop as I have sand under it and it drains right away. Inside the coop I have a deflector that direct the extra drips into the cleanout pan and bedding.


What about ventilation? I have a small window above the nesting boxes that was not shown in the construction video. This provides good airflow in the summer. In the winter, we have the door open tot he coop all day and there are enough cracks and gaps in the siding to allow for decent air to get in.


Why don't you let them free range? We have tried letting them out in our yard a little at a time and they just do too much damage too quickly. They tear into the garden, scratch through the mulch around the trees, poop all over the grass, and eat anything we have growing in the garden. We designed the chicken tractor to move them around and let them scratch through the grass in a contained area. We also let them loose in the garden in fall when we are done growing.


How do you prevent freezing? This year we used heat tape and insulation to wrap the outside portion of the watering system. This was not sufficient to keep the inside portion thawed as well when we had sustained temps below 0 degrees. I will redesign and only heat the inside portion this year. video to follow.


What would you do differently? First I would make the cleanup tray access door about 2 inches larger to allow for a heaping pile of bedding to fit out on top of the tray when I pull it though (suggested by a subscriber, thanks!). I would also have used larger door latches instead of those cheap bolt locks on the chicken run door. Lastly, I would have raised the nesting boxes up about 4 inches from the main coop floor.


Is the cleanout tray needed and worth it? This is completely up to you. I personally love it and I think it makes it so easy to just pull it out on the wheel barrow and take it back to dump it. You can just leave it out and pull up the wheel barrow next tot he coop and sweep the bedding out. Either way it is still super easy to clean.


I hope that helps answer some of the common questions. If you have any comments or questions I did not answer please let me know!


Simple Suburban General Store


Please follow us on....

http://www.pinterest.com/simplesuburban/
http://www.facebook.com/simplesuburbanliving
http://www.twitter.com/simplesuburban5
http://www.instagram.com/simplesuburbanliving


Monday, March 30, 2015


Check out this video to see how to make a quick replacement of just about any power cord. In this case I am replacing the power cord on a Black and Decker circular saw but the process should be very similar for just about any brand and also other power tools.


STOP! If you are here on this page or about to watch this video you have no doubt already considered just wrapping some electrical tape around that cord that you cut. Am I right? How many of your tools already have tape on the cords? Come on, be honest, we have all done it. But before you break out that giant roll of black tape and start binding things together you may want to consider getting the job done the right way. Tape doesn't exactly make for the safest electrical connections and no one wants to see someone get hurt.


So now that we have that covered lets move on to a very fast and easy repair for that damaged power cable. You can pickup a new cable at any home center, hardware store, or via amazon with the links below. There are only two things to consider when getting a replacement. Does your tool have a 2-prong or 3-prong plug and what amperage does the tool draw. For most tools the amp rating is written on a label somewhere with the model number. It might even be on the cable itself. In my case I have a 10 amp tool. That just means that the cord I buy to replace the one I cut needs to be at least 10 amp or higher. In this case I purchased a 13 amp cord which will be just fine for this application.


Normally with any power tool the casing comes apart and splits in half exposing the trigger switch and the power cord inlet. Check out the video for an example. Once you take out those screws just unscrew the wire leads connecting to the switch (pay attention to white and black and their respective terminals) and remove the cord protector from the old cord. This is that hard rubber piece that is at the most flexed part of the  cord, where it enters the tool.  In my case removing the cord protector was the hardest part.

Once you have the old cord removed just slide the cord protector on to the new power cord and then fit it snugly back into the tool handle. Reconnect the wires to the correct terminals (Hot (black), neutral (white), and ground(green)).

Once things have been reconnected make sure the wires fit nicely back into the handle cavity and then replace the cover or side of the tool. Done!

This is a very simple and cheap (less than $6) repair that when done properly can add years of life to your tool. Don't risk electrocution or someone in your family getting hurt by putting a band aid on your tools with tape!

13 Amp 2 prong replacement cord - http://amzn.to/1NiHI4G
13 Amp 3 prong replacement cord - http://amzn.to/1NiIfnl


All of these products and more recommended items from the SSL Family are available at the Simple Suburban Living General Store
 

Please follow us on....

http://www.pinterest.com/simplesuburban/
http://www.facebook.com/simplesuburbanliving
http://www.twitter.com/simplesuburban5
http://www.instagram.com/simplesuburbanliving


Music - "Darien Gap" by Josh Woodward. Free download: http://joshwoodward.com/song/DarienGap


This post has been shared at:  Homestead Blog Hop

Thursday, March 19, 2015


Do you have to wash your fresh eggs? Do they need to be refrigerated? These are some of the questions I get most often concerning the handling of eggs from our suburban coop. The fact is that the nature God-given coating that is on an egg provides an amazing amount of protection and the less we do to mess that up the better we are!

There is a big difference between the eggs you pull right out from under one of your backyard chickens and one that you purchase at the store, a BIG difference. The chickens that you raise, feed, and take care of are no doubt (well if you take good care of them) healthier than those found crammed in some giant factory farm cage somewhere. The eggs from the factory farms are immediately washed and then packed and refrigerated to prevent bacteria from growing in those eggs. This process takes the natural protection away from the eggs and exposes all of the tiny pores of the shell to outside contaminants which makes refrigeration a must. However, with your farm fresh eggs this does not need to be the case.


When you collect your own eggs they can be cleaned and put into the fridge and stored for several weeks this way with no problem but it is largely not necessary. The coating provided by the chicken is the best defense from bacterial growth in the first place. Washing that coating off is the equivalent to pulling of the eggs protective respirator in a disease infested world. It won't survive long without the protection given naturally by good old' mama hen.

We generally collect our eggs mid-morning and then bring them in and place them in a dish or cartoon near the sink. We do not wash them right away or refrigerate them. They just sit right there until needed by one of the SSLMom's awesome recipes or for one of our famous breakfast egg sandwiches. Once we are ready to use an egg we simply rinse it off with warm water (don't want to accidentally drop poopy eggs shells in breakfast do you?) and throw it in the skillet or mixer. We have left the eggs at room temperature like this for over two weeks at times (although I would probably not let them sit much longer than that).

If we start to get a stockpile of eggs that we cannot eat fast enough then we may wash off a batch and put them in saved egg cartoons for friends or family. We try not to give away eggs with chicken mess still on them:)

The bottom line here is that the natural way the chicken eggs was made by our creator allows for us to store them without worry of bacterial infection at room temperature without the invention of the refrigerator. How do you think people use to store them for the thousands of years before the refrigerator?

There are also other ways for long term storage at room temperature that I will not get into here today but may talk more about on a later discussion.


Please follow us on....

http://www.pinterest.com/simplesuburban/
http://www.facebook.com/simplesuburbanliving
http://www.twitter.com/simplesuburban5
http://www.instagram.com/simplesuburbanliving


Wednesday, March 18, 2015


Here the conclusion of the utility sink installation.  If you haven't already, make sure you check out the first post & video where I covered the water supply.  In this video I am using an old garden hose section to complete the drain for this project for under $5. Whenever I try to do projects like this I always like to use things I have laying around before I go out and buy new parts. I would love to have done a full 1 1/2" drain pipe all the way over to the sump but had this broken garden hose laying around and could not resist trying to use it as the drain.

I picked up a couple of fittings to transition from the 1 1/2" PVC male adapter on the bottom of the utility tub to a 3/4" threaded male hose connection. Total cost was under $5 for those parts and the rest was made with a piece of hose.
 
The connection was simple, glue the pvc fittings together, hook up the hose, and run it over to the sump about 8 feet away. I then tested the drain rate by filling the tub up and letting it drain and running water continuously for about 5 minutes. The hose seems to keep up and drain the tub just fine so I am going to clal this a success for now.
 
The only concern I have is that the smaller diameter hose may get clogged easily if anything gets flushed down the drain like small pebbles, dirt, etc. I will keep you updated if this turns into a pain in the long term.


Utility Sink parts:
Utility sink - http://amzn.to/1Mj6q4u
Water supply valve - http://amzn.to/1GulDPN
Cheap faucet - http://amzn.to/1BYK8Uf
 
Tools of the trade:
Spark start torch head - http://amzn.to/1BMl54f
Mapp Gas cylinder - http://amzn.to/14G5DdF
1/2"-3/4" pipe and fitting cleaner combo tool - http://amzn.to/1BSy2ao
Tight spaces pipe cutter - http://amzn.to/1y0INKD
Pipe cutter - http://amzn.to/1xP2qDj
Lead free solder - http://amzn.to/1wGPqvL
Flux - http://amzn.to/1yPxXqA
 
All of these products and more recommended items from the SSL Family are available at the Simple Suburban Living General Store
 
Remember to follow us on.....

Music - "Shadows in the Moonlight" by Josh Woodward. Free download: http://joshwoodward.com/song/ShadowsintheMoonlight