
 |
Are you sick of cleaning out those traditional water dispensers? For years when I was a kid my least favorite part about having chickens was that I had to go out in the cold and clean out their water dispenser and even though we had it on a hot plate it seemed to freeze anyway. Check out this watering system from the SSLFamlyDad that addresses these issues and saves money on energy.

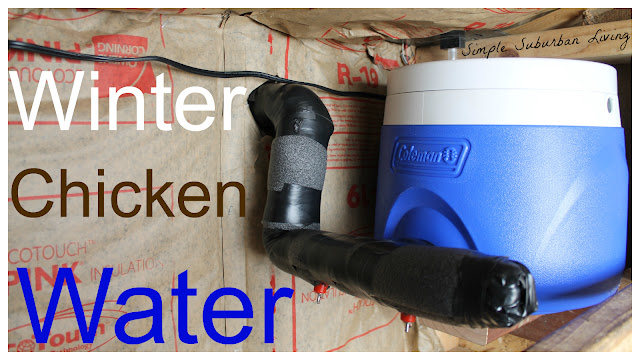
I have tried different things with other watering systems for the chickens and had mixed results. Although I am probably not done experimenting with different ideas, this is the latest:) This system is made of a small 2 gallon Coleman cooler and a few PVC fittings and small sections of pipe.
I started by removing the spigot that comes installed in the cooler. You can then use a 1/2" male and 1/2" female threaded PVC adapter to connect through where the spigot was. I would recommend using some silicone around the fittings to ensure a good seal.
 On the inside of the cooler glue in a 1/2" street 90 and point it upward. This will allow some water to always stay in the bottom of the system so that the heater does not burn up. Next, on the outside or the cooler, you can attach any configuration of piping and the chicken nipples that you would like but I chose a basic spilt setup.
  I attached a short piece of pipe to the outside 1/2" fitting and then a tee. One short piece of pipe on each side of the tee with a cap on one side and a 90 on the other. On the side with the 90 I ran that up to another 90 at the same height as I want the highest water level to be in the cooler. This will hopefully prevent overfilling from the outside. This section will be run out through the coop wall so that I can fill it from the outside.
 For the chicken drippers you can size up a small bolt that matches the thread size of the drippers for pre-threading the holes. I used an 11/32" drill bit to drill one hole in each side of the pipe coming out of the tee on the bottom. You can then thread in the appropriate sized bolt and back out to create some threads to start the plastic drippers. Use some silicone or thread sealant and thread in the drippers, one on each side. I also wrapped the piping in 1/2 foam insulation and some electrical tape.

The last things is to mount the 50 watt aquarium heater to the bottom using the included suction cup. I also put a dab of silicone on the suction cup to hold it down firmly to the bottom. I also cut a small notch in the lid threads on the cooler to feed out the cord for the heater as well.
 You are now ready to install it in the coop. I made a small shelf for mine inside the coop for the winter but I am not sure if I will continue to keep the system inside the coop as it tends to make a mess. I will update on that later. I routed my fill pipe out the back wall of the coop and placed a small threaded fitting there so I can attach a homemade PVC funnel to it for filling. You could also omit this step and just open the lid and pour in some water that way as well.
 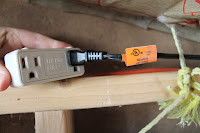 Once you are all setup you can just plug in the aquarium heater to electric however you can (extension cord, hardwired electric box, etc). I also use what is called a thermostatic electric outlet in my setup. This outlet only powers on the heater when the temp reaches 32 degrees or below and stays on until it gets up to 44 and then shuts off. This prevents me from heating water when it is warm outside and thus saving on electric costs. I have used this same outlet for a heat lamp in the past and it works great.
Full Video Walkthrough here
All you need for this project below
2 Gallon cooler - http://amzn.to/1MsHgAY
5 Gallon cooler - http://amzn.to/1QyXBZ5
ThermoCube outlet - http://tinyurl.com/qz5aa9c
Chicken Drippers - http://amzn.to/1uQ8PIM
5 Gallon cooler - http://amzn.to/1QyXBZ5
ThermoCube outlet - http://tinyurl.com/qz5aa9c
Chicken Drippers - http://amzn.to/1uQ8PIM
All of these products and more recommended items from the SSL Family are available at the Simple Suburban Living
General Store - http://astore.amazon.com/simpsubulivi-20
Please follow us on....


21413
ReplyDeleteIt is necessary to perform routine maintenance on your existing sprinklers for them to last longer. lawn sprinkler system parts
ReplyDeleteTogel2win
ReplyDelete