• What is Simple Suburban Living?

    Homesteadin'. Green living'. Animal lovin'. Square foot farmin'. Tree huggin'. Followin' Jesus. That's Simple Suburban Livin'.

  • Backyard Chickens

    Our little homestead grew with the addition of chickens this year. We are happy to share the journey of raising chicks and building the chicken coop with you.

  • Aquaponics and Gardening

    Simple Suburban Living offers a weekly aquaponics episode that highlights the saga of our indoor aquaponics gardening system. We also share our knowledge of square foot gardening and planting seeds. Our homestead is located in southeastern Michigan.

Showing posts with label grow media. Show all posts

Saturday, January 16, 2016


https://youtu.be/SwyONxd-AuA

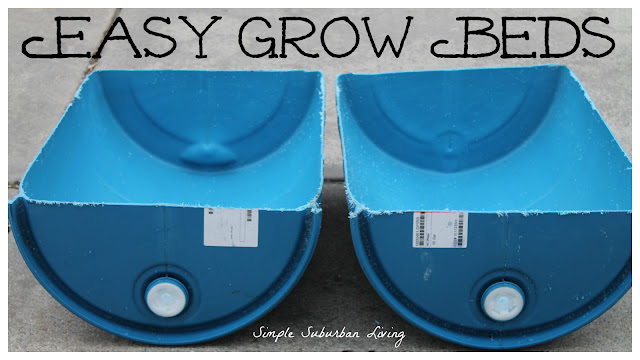
Every aquaponics or hydroponics setup needs to start with a good set of grow beds. But, what should you choose? Cement mixing trays, PVC pipe, gutters, pond liner with wood boxes, troughs, feeders, waterers; there are so many options! The best option in my opinion, for an aquaponics system especially, is these 55 gallon plastic barrels. They are cheap, durable, food safe, and generally come with food products in them so they are easy to prep. Below is a method that I have developed to get these cut perfectly in half and ready for your setup.


I have used both the white and the blue 55 gallon drums but I prefer the blue ones. These generally come with food materials in them and are easiest to clean. In my first system I used the white ones and they had some type of cleaner in them. A quick trip to the power washer took care of it but I was always unsure if I had removed it all well enough. I have had the best luck on Craigslist finding these and pay between $10-$20 depending on how far I want to drive to get them.


 There are a couple of different types of plastic that you should be aware of when working with anything you are growing food in. Some  grades and types of plastic are safe while some are not.
HDPE, Vinyl, LDPE, PP, and PS are some of the labels that you will see, most commonly HDPE, which is High Density Polyethylene. All of these listed here are considered food grade or food safe plastics. I have also seen the label above "PE-HD" with the same recycling symbol (2). I can't say why it is labeled differently but it is also supposed to be High Density Polyethylene and food safe.


 Now down to the fun part, cutting stuff! For a perfect grow bed you need two perfect halves. There are two methods to accomplish this. the first is to just follow the seem with a circular saw and cut the barrel in half. The only problem with that method is that the seam goes right through the bung on each side of the top lid rendering them useless. This is fine if you do not plan to use them and I have actually done this for some of mine. However, the best way is to leave them intact. So how do you cut a cylinder perfectly in half? Well, the easiest way is to first make yourself a larger square. I screwed these two pieces of 2X4 together at a perfect 90 degree angle to use here. You could also use a large carpenters square.

Start by measuring out and marking the center point on the top of the barrel lid. Then use a square to draw a perpendicular line across the top of the barrel. This will give you your references to draw down the sides. Now, use your large square placed on the lid to match up to the line on the top and transfer it down the side of the barrel on each side. You can then transfer the line onto the bottom on each side and connect the two together. You now have a perfectly straight line to follow with your saw. You can cut these anyway that you would like but I have found a circular saw to be the easiest. You could also use a reciprocating saw, saber saw, jig saw, hand saw, router, dremel, angle grinder, etc.


What you end up with is two perfectly neat and equal halves with the threaded bungs intact and centered at the bottom of each barrel. These are very useful for connecting barrels together, external bell siphons, water supply piping and other things I am sure I have not thought of yet. I will talk more about installing these and building a frame for them in a later post and video, until then, thanks for stopping by!
Full Video here
Please follow us on....


Tuesday, November 18, 2014


This aquaponics project has been one of the most interesting and rewarding things that I have ever built and I never could have imagined how it would have turned out over a year ago when I got the idea. My wife and I were looking for ways to be more sustainable and wanted to get more into gardening and growing our own food in the upcoming year. We had watched a few documentaries on food production, organic food, sustainability, and a few other related topics and were becoming more and more interested. We also kept finding it hard for us to eat healthy foods on a budget when it seems like the healthier you try to eat the more and more expensive it becomes. That is when we decided to start into this aquaponics adventure and let me tell you, it has been an adventure!


I have been running the system in the basement now for coming up on a year now and have recently completed all of the grow lights and grow media needed for full production. I have had a lot of questions surrounding the various costs and upkeep of the indoor aquaponics system and so I thought I would provide as much detail as possible on that. There are two categories of cost to set up something like this, maintenance costs and the one time setup costs to build the system. I will start with the setup costs listed below. I have also included links to many of the items on Amazon that I used in the system.

Setup costs -
Here is a list of the components and their costs -
55 Gallon Drums - 5 @ $10 - $50
Wood and Screws - $40
PVC pipe and fittings - $50
Aquarium heater - $12
Float valve for automatic top-off - $15
Air stone and air pump - $15
Aquarium water pump - $40
Bulkhead adapters 2" and 3/4" - $50
Light fixtures - 4 @40 - $160
Grow media - $70
Bulbs - $90
Misc - $10
Giant bucket of fish food - Priceless

Total system build cost - $602

When we originally planned to build this system we had budgeted about $400 and thought I could have it all setup in a couple of weeks. Well, as my wife always tells me "figure twice as much and twice as long". It wasn't quite twice as much but it surely took twice as long to build it! Now, many of you are saying "$600, that is a lot for growing some lettuce in your basement!". At first thought, you are right, it is a lot of money. However, if you are looking to build something similar you do not have to be as elaborate as this setup, there are many ways to cut costs as I discuss in the video further. There are cheaper bulkheads, lights, and other components that you can choose from and if you put this in a greenhouse you can cut that cost in half. This setup has been such an amazing experience for me though, I would have paid twice that to do it again.


 To justify the cost think of it like this, how much do you pay for organic vegetables? How much do you spend on other hobbies such as golf, bowling, sports, games, and other things that you probably don't need. What is it worth for you to have year round vegetables available for you to pick right off of the stem? For us it is a no brainer, it is worth every penny! Once the system is setup the running costs are minimal and the production is just getting started here so lets see how much food we can produce!

Now, on to the matter of running costs. Many people have asked about the lights and what they cost to run as well as the rest of the system. I have  made some estimations here and attempted to calculate an accurate monthly cost to run this system. The calculations are based on 12 hour run times on the lights at .13 cents per kwh (kilowatt hour).

Running costs -

Lights - There are 32 light bulbs combined between all four lights. Each light consumes 23 watts of power for a total of 736 watts. This can be converted into kwh by first converting 736 watts into kw (kilowatts) 736/1000 = .74 kw. this can then be converted into kwh (kilowatt hours) by multiplying by the number of hours the lights are run. I normally run the lights for 12 hours so that makes .74 X 12 for a total of 8.8 kwh's. I currently am paying about .13 cents per kwh with my power company so to calculate the total cost per day I take 8.8 X .13 = $1.14. For one month that is about $34.

Pumps - I have one small air pump and a small water pump, both are estimated at less 12 watts combines power consumption. Using the same calculations as above (((12/1000 * 24)*30) it comes out to about $1.13 per month.

Aquarium heater - This is estimated at about 300kwh per year based on running it at about 70 degrees. Using the same calculations as above ((300 X .13)/12) that comes out to $3.25 per month.

Total month costs - $34+$1.13+$3.25 = $38.38.


 So for just over $1 per day you can have fresh produce growing right in your home 365 days a year! When you relate the monthly cost to so many of the other things that we pay monthly for, Netflix, cable bills, cell phones, data plans, XM radio, hobbies, and other unnecessary things you can easily justify growing your own food indoors. In the end it comes down to what is important to you and your family, yes we can go out and buy fresh produce in the winter. But, where does it come from? Mexico, Brazil, some other far away country? How long has that been frozen or in a truck or airplane? What chemicals were put on it to make it look nice for you at the store? The ultimate goal for us here is to grow enough in the summer to get us through the winter through preserving and canning our fresh food. However, this system will always have a place in our home producing fish and produce for us year round! I hope this info has helped you in your own aquaponics build, happy building!


This post has been shared at:  Homestead Barn Hop